

I'm definitely developing a wrap bracelet addiction! As shown by our ultra-fabulous guest model, they're very comfortable and easy to wear.

By reader request, a tutorial on how I make my beaded wrap bracelets! First, supplies:

1] Cord. Anything 2mm and round should work! If the ends start fraying, dip them in glue.
2] Thread. Thread or beading string. I like embroidery floss because of the wide color selection, but be warned, splitting 6-ply into 3-ply can be tedious.
3] Button. Make sure your cord fits through your button!
4] Beads. Make sure your thread fits through your beads!
I derived a formula to help determine how much cord to use:
([Wrist Circumference] + 0.5 inches)*[Number of Wraps]*2 + 8 inches
For this tutorial, I'm making a double-wrap bracelet for a 5.5 inch wrist, so I should use 32 inches of cord. (In truth, I accidentally cut 30 inches and you'll see later that I came up a bit short at the end!)


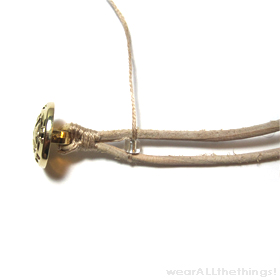
Fold the cord in half, string it through the button, and tie the thread to the cord near the button.
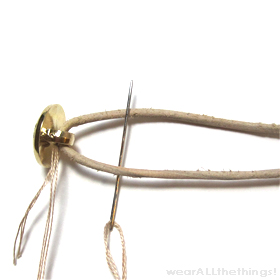


Bring the thread back through where you started; then wrap around the neck a few times. You can take this opportunity to wrap and hide the other loose end of your thread.


Bring the thread through the center so you can start the beaded figure eights.


(From the bottom) go under the first section of cord, through the bead, and over the second section of cord.


(From the top) go under the first section of cord and over the second section of cord.

Second bead.


(From the bottom) go under the first section of cord, through the bead, and over the second section of cord.


(From the top) go under the first section of cord and over the second section of cord.


(From the bottom) go under the first section of cord, through the bead, and over the second section of cord, blah blah blah, you know the drill!


Close off the ends with more of the beadless figure eights from the beginning.


Knots use up more cord than you think! Plan ahead.
(About here is when I realized my mistake and wished I had started with 2 inches more cord!)

TL;DR? A .gif instead:

Have fun! Let me know if you have any questions and please share pictures of any bracelets you make!
· · · · · · · ·✄· · · · · · · ·
Appendix I: Supplies
Forever 21 is currently stocking some beaded necklaces that could work really well with this project! Online, I found: $8.80, $8.80, $8.80, $6.80, $6.80, $6.80. In store, the strands I saw were about 20-24 inches long and going for $7.80:


Fusionbeads.com is a handy site with free shipping within the U.S. if you're looking for gemstones or Swarovski and don't have a local bead shop. 16" strand of 4mm Gemstone Round Beads, $3.90 - $20.53, 16" strand of 4mm Gemstone Faceted Round Beads, 12.65 - $21.45, Individual 4mm Round Swarovski Elements Crystal Beads, $0.14 - $0.29. In my experience the holes for gemstone beads tend to be very small, so you'll need a thin needle and a bit more patience.
Appendix II: Sanity
Appendix II: Sanity

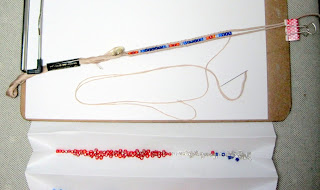
An accordion-folded piece of paper becomes an instant bead organizer, and a clipboard and binder clips will help keep everything in place. I strongly recommend it!
Wow thanks for this tutorial June! I will have to reread it when I'm not tired! Can't wait!
ReplyDelete-Josie, 8bitgrayscale
It was fun to make! I can't wait to see what you come up with! (:
DeleteOMG, I'm so excited about these! I'll probably be working on this, during this long weekend :) Thanks!!
ReplyDeletexoxo,
Genie
Yay! I'm so glad! Will you share what you came up with? :D
Delete